Instructions to buy domain names at Namecheap has the main contents:
- An introduction to Domains
- Why I choose Namecheap?
- Instructions to buy domain names at Namecheap
- Guide to pointing domain name at Namecheap
- Hot promotions
- Instructions to speed up the website WORDPRESS
I. An Introduction to Domains
When you create any website, you basically need 2 things: domain and hosting.
- Domain refers to the domain name, which is the website address that people type in the browser’s URL bar to have access to a website.
For example: tiengtrungquoc.net
- Hosting is a place to store website content or data, in which consists of 3 types: Shared-hosting, VPS, Dedicated Server.
- Domain and hosting both have the same feature, by which you can transferred from one supplier to others. You should take advantages of the promotions of suppliers, especially Namecheap, to get a discount on your favourite domians.
Domain and hosting are different in that: the same hosting package in which many people could sign up and use. But in the domain name, for example with tiengtrungquoc.net, only one person can register and use it.
Therefore, before buying a domain name, you need to notice whether the domain name has been purchased or not.
1. Before buying a domain name at Namecheap:
When you buy a domain name, you need to pay attention to 3 things: registration price, transfer price, renewal price.
There are some domain names that are very cheap to register, but very expensive to renew: for example: .xyz , when registering the website at Namecheap for the first year is only about 1 USD, but the renewal price is about $10.88 for 1 year.
At first, I thought that it was a bargain and impressive, so I got the domain name “tiengtrungquoc.xyz” for my website. When i told that idea to my friends and students, they all had bad feedbacks and evaluations.
I boldly switched to .net, the name sounds much more professional. It took me a few months to pull traffic from the old domain name to the new one. I found it was quite hard and tiring. You should learn a lesson from that, let buy a good domain name for a website of your own such as .net, .com.
At the current period:
.com : registration price: 8.88/year, renewal price: 12.98/year, transfer price from other providers to Namecheap: 8.58/year.
.net: registration price: 11.98/year, renewal price 14.98/year, transfer price: 10.88/year
For more pricing information for other international domain names at Namecheap on: namecheap.com/domains/registration/gtld/aaa/
In which, aaa is the extension of the domain name, for example: .com, the address will be namecheap.com/domains/registration/gtld/com/
2. After buying a domain name at Namecheap:
You need to keep in mind two things:
- First, keep and secure the email address that you use to register the domain name. Web hosting provider or the domain name seller will send you several crucial email notifications when your domain name is about to expire.
- Second, keep and secure the account on the supplier’s website
II. Why I choose Namecheap?
1. Namecheap is a reputable supplier with many attractive promotions
The first provider I used to buy domain names was Vietnam’s Tenten. However, while surfing the web, I saw the banner below that caught my eye:
Since then, I have learned thoroughly about Namecheap. Namecheap which was established in the US in
2000 provides domain names and hosting, has been existing for 20 years, that domain very reputable and preferred. This supplier offers a lot of very attractive promotions.
I took advantage of the opportunity to transfer the domain name tiengtrungquoc.net from Tenten to Namecheap for $6.66/year. The transfer process happened smoothly in 1 day: The remaining term of the domain name in Tenten was 15 days (> 7 days),
Enter AUTHORIZATION CODE, there was enough money in the visa credit card to pay.
For more detail: Get a .COM for just $5.98! Aug 13 11:00 – Oct 01, 2021
2. WhoisGuard
WhoisGuard is a service that hides the contact information of that domain owner to avoid being used to cheat/spam. When you buy a domain name at Namecheap, you get it for free for lifetime.
3. The domain management interface is quite simple, complete and easy to use
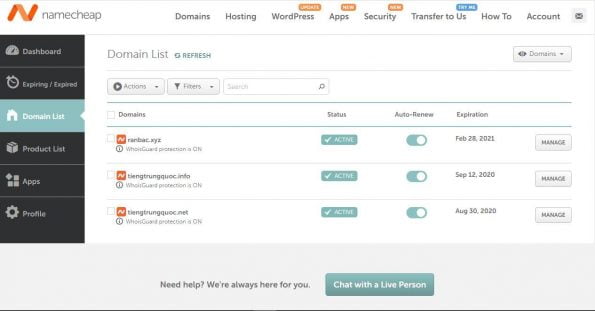
When you click the Domain List button, a list of registered domains will appear.
Then, click the Manage button to manage the settings for the domain name.
You can manage auto-renewal for domains and WhoisGuard by clicking the AUTO RENEW button on the right, renew manually by the ADD YEAR button.
4. Customer support 24/7 via Ticket and Livechat
When using it, I encountered some questions about setting DNS records, CDN … I contacted the provide Namecheap via Livechat, they were very supportive.
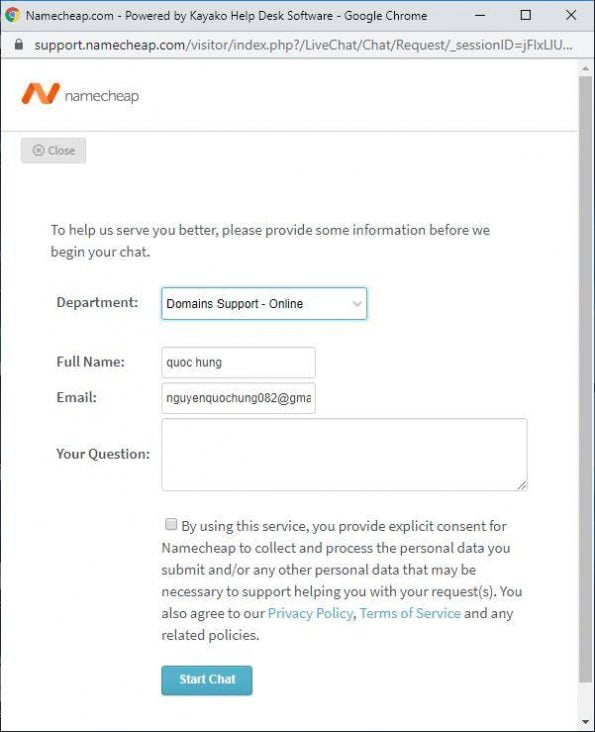
If you are instructed but still can’t install, let give them Support Pin and username and they will help to install. If your English is weak, you can use google tranlate. Even if the grammar is wrong, they still understand what you say so dont too worry.
You can also send your questions to Tickets to receive support instead.
First and Last Name:
Email:
Support Category includes:
– Transfer
– DNS issues
– Domain Registration
– WhoisGuard: service to hide personal information
– Email Forwarding
– Other
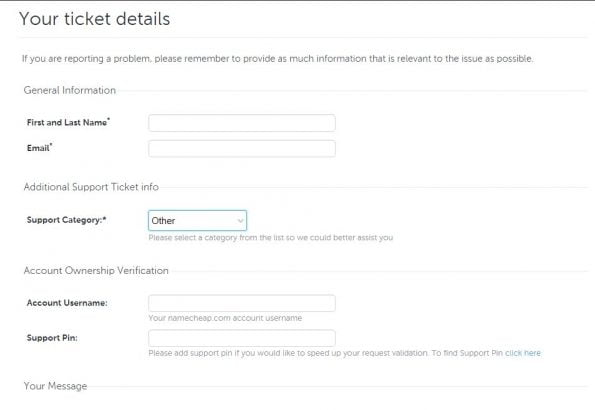
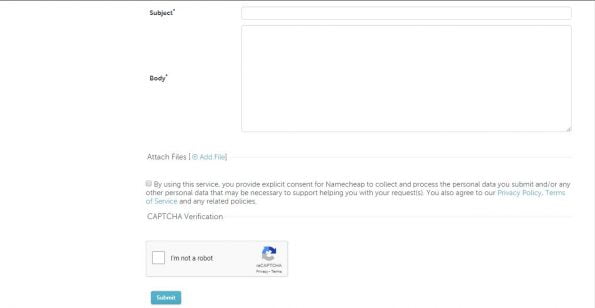
Subject: Enter the name of the content to be supported.
Body: Detailed description of the content you are in need of support.
Attach Files: You can send a screenshot of your problem by using the Add files button.
Tick “By using this service, you provide explicit consent for Namecheap to collect and process the personal data you submit and/or any other personal data that may be necessary to support helping you with your request(s).
You also agree to our Privacy Policy, Terms of Service and any related policies.”
Click I’m not robot and Submit.
Are you eager to buy it? The main content of the article Guide to buying cheap domain names at Namecheap is right below.
III. Instructions to buy domain names at Namecheap
To buy a domain name at Namecheap, you need to prepare 2 things: an email address (use to confirm your account and receive email addresses noticed from Namecheap) and 1 VISA debit card with sufficient or excess funds to pay.
VISA – Abbreviation of the US Visa International Service Association financial group
Thus, making a VISA card means making a Bank card with the VISA brand – protected by the VISA financial group.
Regarding VISA debit card, you can register at ACB. I am using it and being very satisfied. You are able to pay both international and domestic payments. The ACB account number is short and easy to remember.
For example, my ACB account number is 5448657, Nguyen Quoc Hung. You can transfer money to check.
1. Instructions to buy domain names at Namecheap: Register an account
Before buying a domain name, you need to have an account at Namecheap, if not let register:
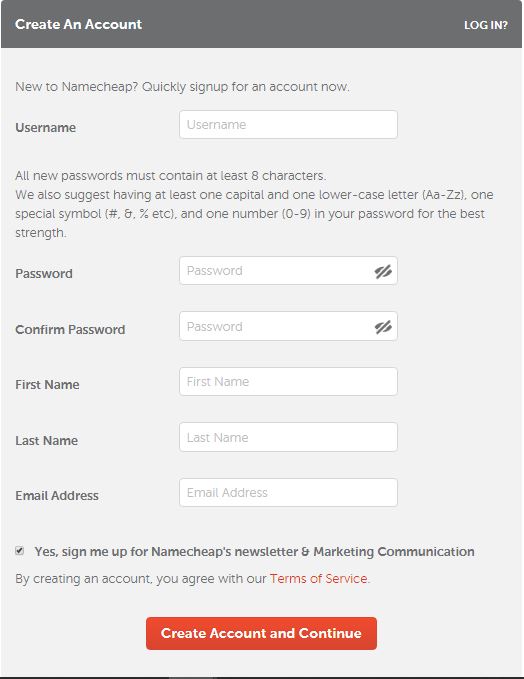
After registration is complete, open your email to confirm, then go to namecheap.com, click the Sign in button, fill up the information and log in.
2. Instructions to buy domain names at Namecheap: Choose a domain name:
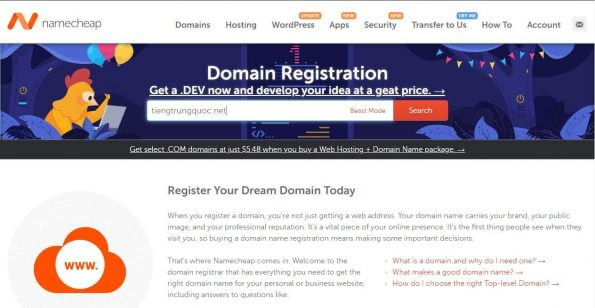
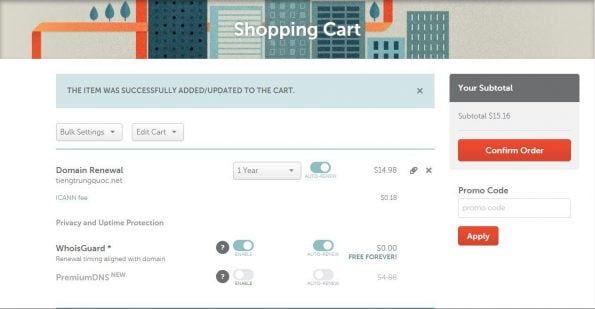
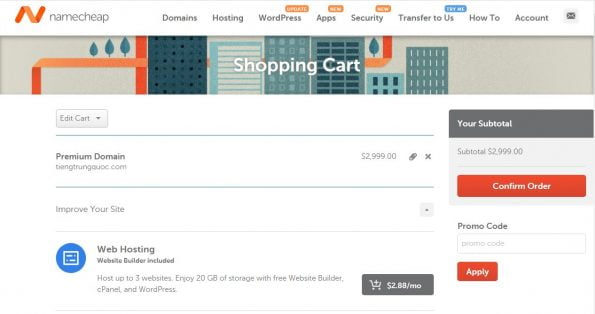
If the returned result has the word REGISTERED in gray, it means that this domain name is already registered by someone else. Choose another, and click the Add to Cart button, then View Cart.

If your domain name is not a premium domain, there is an option for a payment term
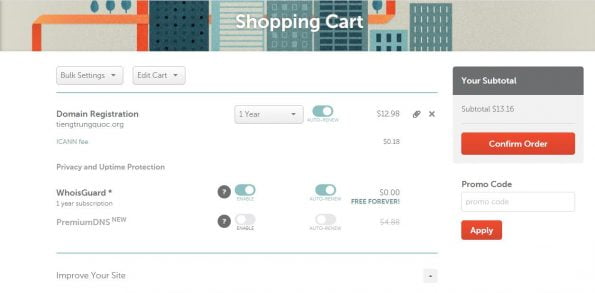
If there is a discount code (Promo Code), enter the code, then press Apply, select Confirm Order.
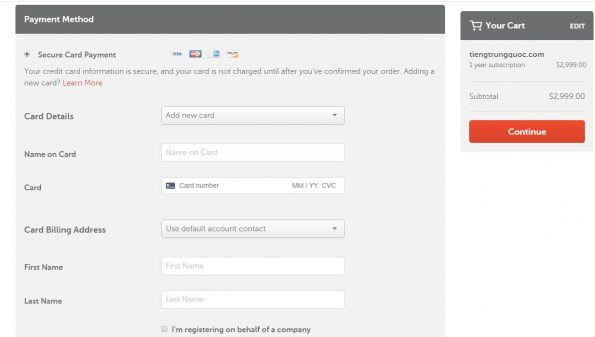
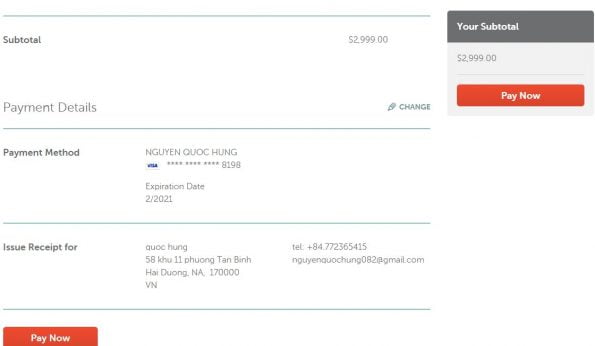
3. Instructions to buy domain names at Namecheap: Payment
Select Secure Card Payment, enter your card information.
Name on Card:
Card number: 16 numbers in front of the card
CVV: 3 security numbers on the back of the card
Expiration date: card’s expiration month/year
Uncheck the line “I’m registering on behalf of a company” in the case you are registering for your own use. Then click Continue.
Enter your address, select “Remember this card for later use” to remember to use it next time, then click Continue
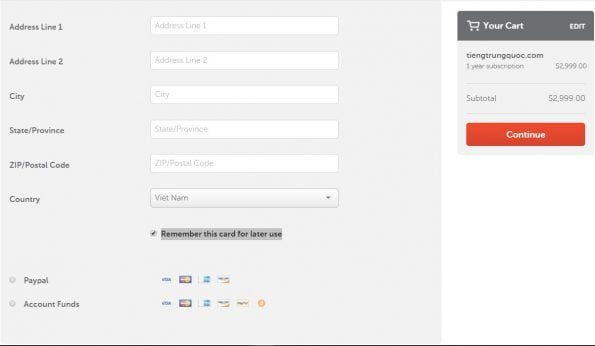
Check the information that is correct, then click Pay now
After completing the payment, you will receive a notification email from Namecheap. You check your email and proceed
Verify your domain name registration email by clicking on the link Namecheap sent via email.
IV. Guide to pointing domain name at Namecheap
1. If you only use the domain name at Namecheap but don’t use Namecheap’s hosting
If you want to point the domain to Namecheap’s NAMESERVERS, you can use NAMESERVERS Namecheap BasicDNS
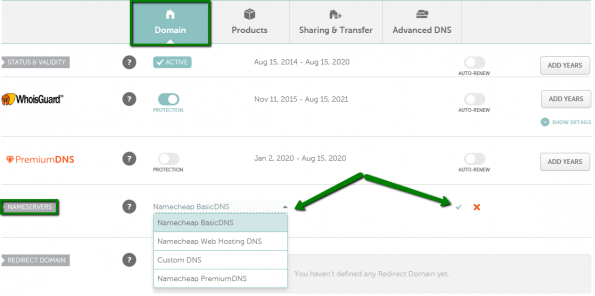
Here, I used Namecheap BasicDNS for the domain ranbac.xyz
2. If you use both domain name and hosting of Namecheap
If you want to point the domain to Namecheap’s NAMESERVERS Hosting, use NAMESERVERS Namecheap Web Hosting
DNS.
3. If you want to point your domain at Namecheap to Cloudflare’s DNS DNS
Then choose CustomDNS with the setting: alexis.ns.cloudflare.com ; nina.ns.cloudflare.com
When you change hosting, you also have to update the IP address of the hosting. I urge using CloudFlare as Intermediate DNS, it has a very fast update speed. If you use your domain name provider’s default DNS or of your hosting company, it can take a few hours or a whole day for the updated records to reach DNS servers around the world. While with CloudFlare, this is likely to take only a few minutes.

4. If you want to point the domain name at Namecheap to free website services & forum
- Select Namecheap BasicDNS
- Select the Advanced DNS tab
- Set as shown below
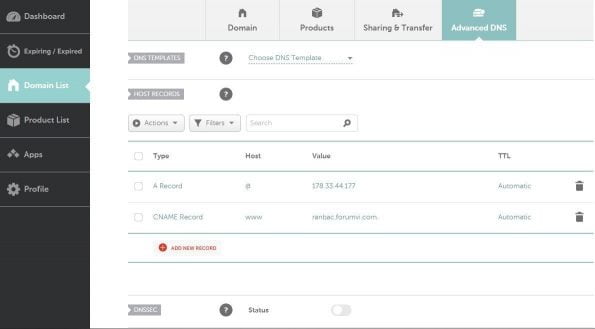
ranbac.forumvi.com is a free domain name provided by Forumotion – free forum creator.
178.33.44.177 is the IP address of the domain ranbac.forumvi.com.
I used the ping command: ping ranbac.forumvi.com
5. If you want to point the domain name at Namecheap to the IP hosting of the other provider
- Select Namecheap BasicDNS
- Select Advanced DNS
- Install as shown below. For example, point the domain name to Tinohost’s IP hosting
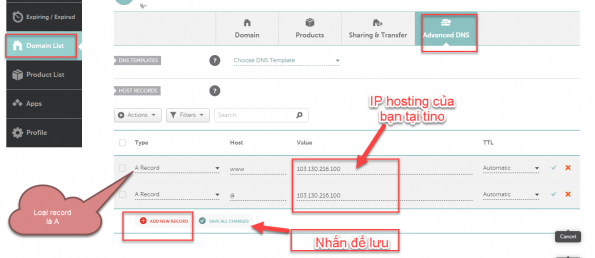
Finally, click on SAVE ALL CHANGES to save the records you have configured.
After the configuration is complete, DNS will be updated in about 15 minutes and in 3 hours at the latest.
V. Hot promotions:
Get a .COM for just $5.98! Aug 13 11:00 – Oct 01, 2021
VI. Instructions to speed up the website WORDPRESS
To speed up WORDPRESS website you can use 3 methods:
+ Method 1: Using Litespeed Cache + Object Cache (Memcached) + Opcode Cache and CloudFlare CDN
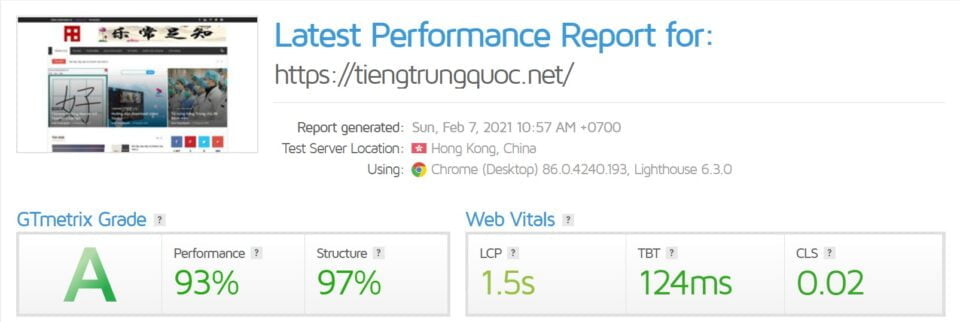
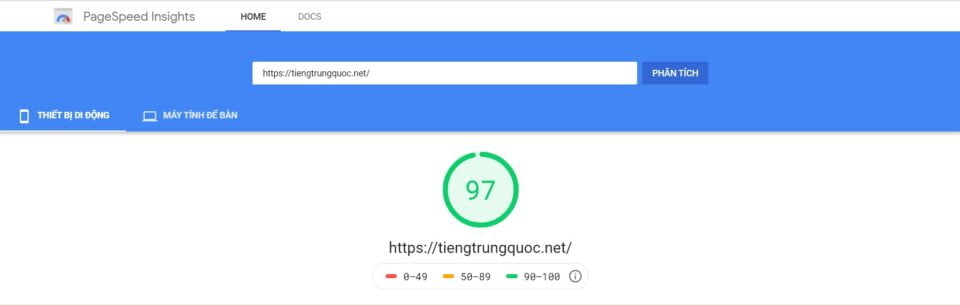
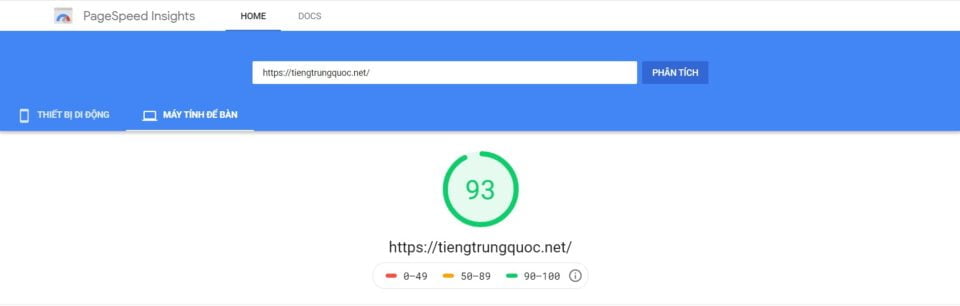
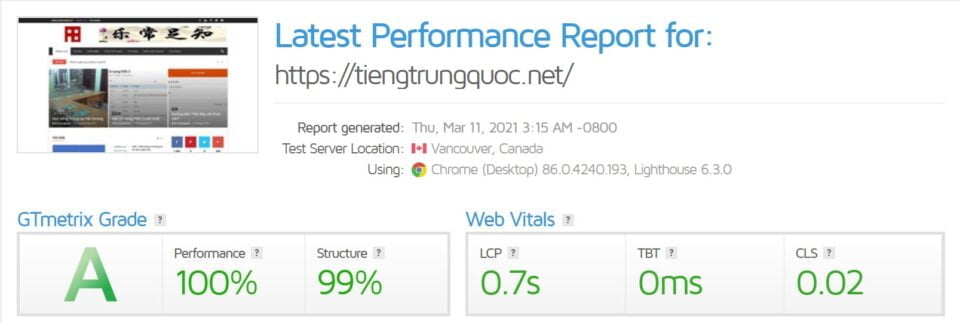
Optimizing GTmetrix (Server Hong Kong, China + Server Vancouver, Canada) + PageSpeed Insights (Mobile +
Desktop)
+ Method 2: Using Litespeed Cache + Object Cache (Memcached) + Opcode Cache and Quic.Cloud CDN
Optimizing GTmetrix (Server Hong Kong, China + Server Vancouver, Canada) + PageSpeed Insights (Mobile + Desktop)
+ Method 3: Use only Litespeed Cache + Object Cache (Memcached) + Opcode Cache
Optimizing GTmetrix (Server Hong Kong, China) + PageSpeed Insights (Mobile + Desktop)
1. Use LiteSpeed Cache
If your hosting has LiteSpeed Webserver Enterprise, you can use the following optimized installation file for WordPress here:
LSCWP_cfg-tiengtrungquoc.net_-20210311_151207.zip
After downloading, then extracting. After that, to import the data file into LiteSpeed Cache! Keep in mind to only use Lazyload’s
LiteSpeed Cache only, do not use Lazyload of any other parties
From version 3.0, Export/Import feature has been moved to the Toolbox section.
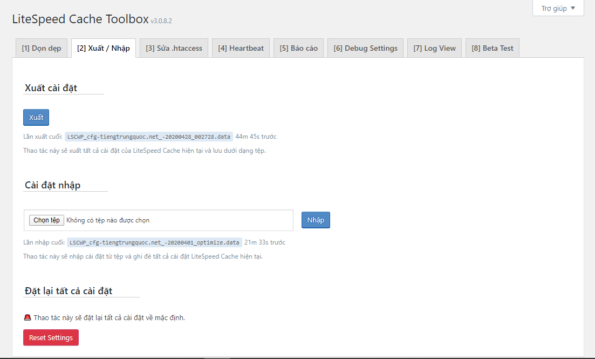
Step 1: Select the file
LSCWP_cfg-tiengtrungquoc.net_-20210311_151207.data , then click Import button.
Step 2: Click Delete All
If your website places Google Adsense Ads, then the Page Optimization > JS Settings > Load Inline JS section will not select Deferred. You can opt for Default or After DOM Ready.
2. Using Object Cache (Memcached)
Go to your hosting’s cPanel, find the Select PHP Version section and click on it. Find the extension named memcached and tick it
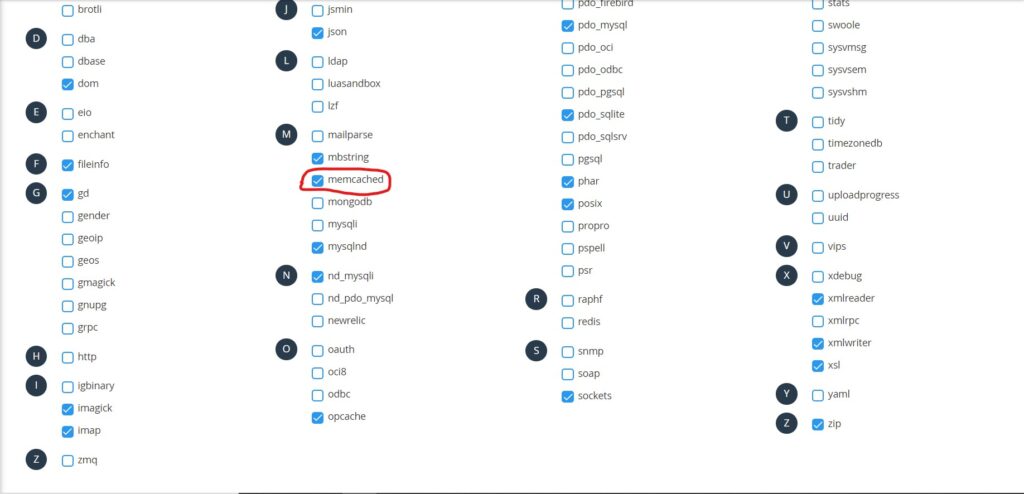
Go to your hosting’s cPanel, find the Server Application Manager entry and click on it. And Enable for Memcached.
Copy socket address. For example: /home/tiengtrungquoc/.applicationmanager/memcached.sock
Go to wp-admin, find LiteSpeed Cache > Cache. Select the Object tab

Enable Object Cache, choose the Memcached method and enter the socket address in the host field. Then select Save Changes.
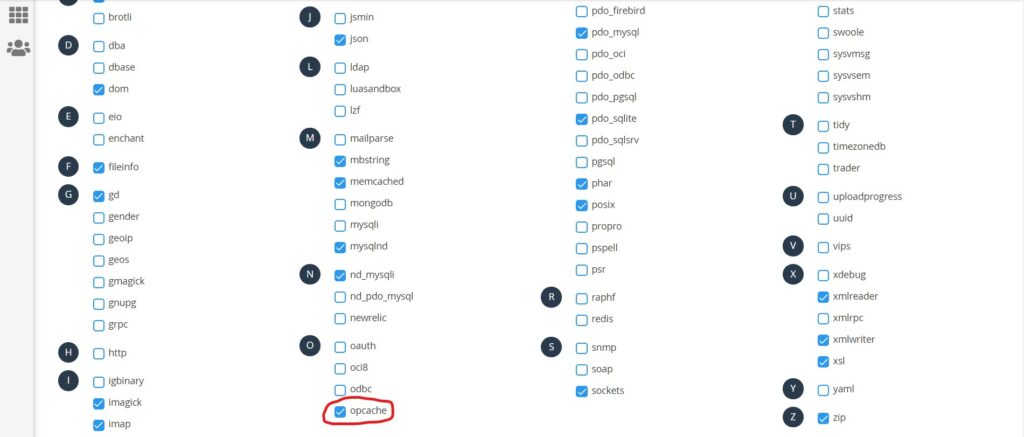
3. Use Opcode Cache
Thanks to the ability to cache PHP queries, OpCode Cache will help your WordPress blog / website load faster, save resources (CPU) and thereby increase the load capacity.
Go to your hosting’s cPanel, find the Select PHP Version section and click on it. Find an extension named opcache and click on there.
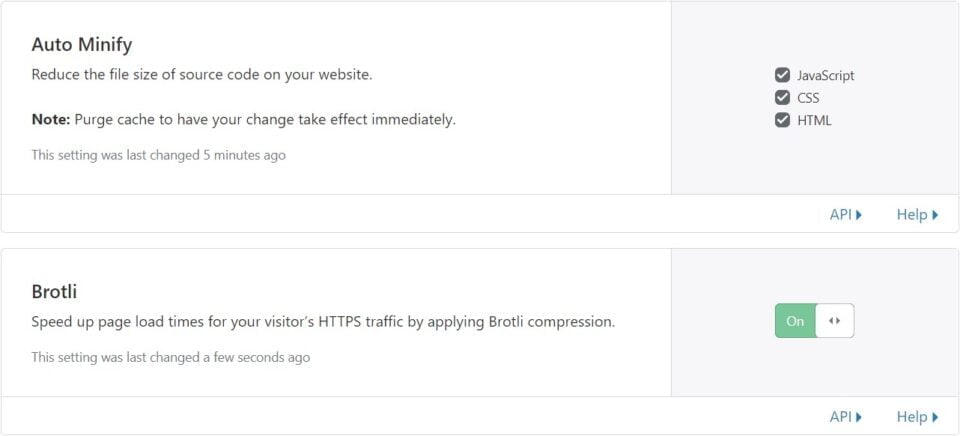
4. Use Cloudflare CDN
When you use Cloudflare CDN, the score on the default GTmetrix server Vancouver, Canada will improve significantly.
GTmetrix Grade will get B

If you are still not satisfied, you continue to log into Cloudflare, go to Speed->Optimization, install as shown below
Tutorial video to speed up WORDPRESS with LiteSpeed Cache + Cloudflare : Simple, fast, understandable and effective.
5. Use QUIC. cloud CDN
Admin Dashboard > Litespeed Cache
First in the Overview, then Request Domain Key!

After the perform successfully, F5 again
Then select link to QUIC.Cloud to connect to your https://my.quic.cloud/ account. After the connection is complete:
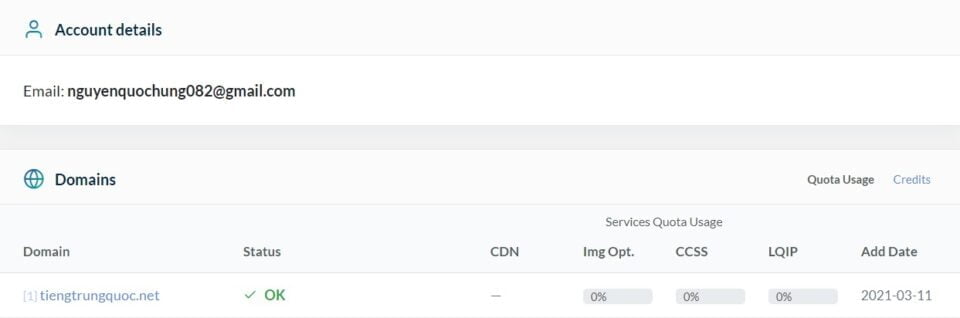
From then on, you can use QUIC.cloud’s services: CDN, Image Optimization, CCSS, LQIP
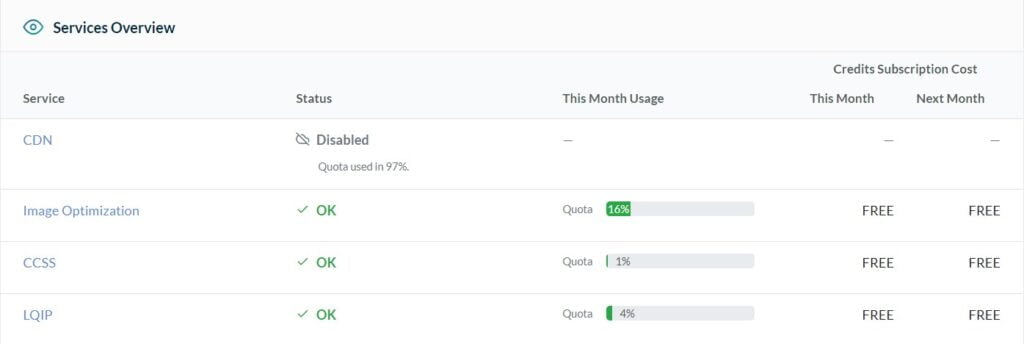
QUIC.Cloud’s Image Optimization service is so lovely.
When you import the optimal settings file
LSCWP_cfg-tiengtrungquoc.net_-20210311_151207.data ,
The image will automatically be sent to QUIC.Cloud for optimization, then automatically download the optimized image to hosting. The speed is in standard. Not limit number of images.
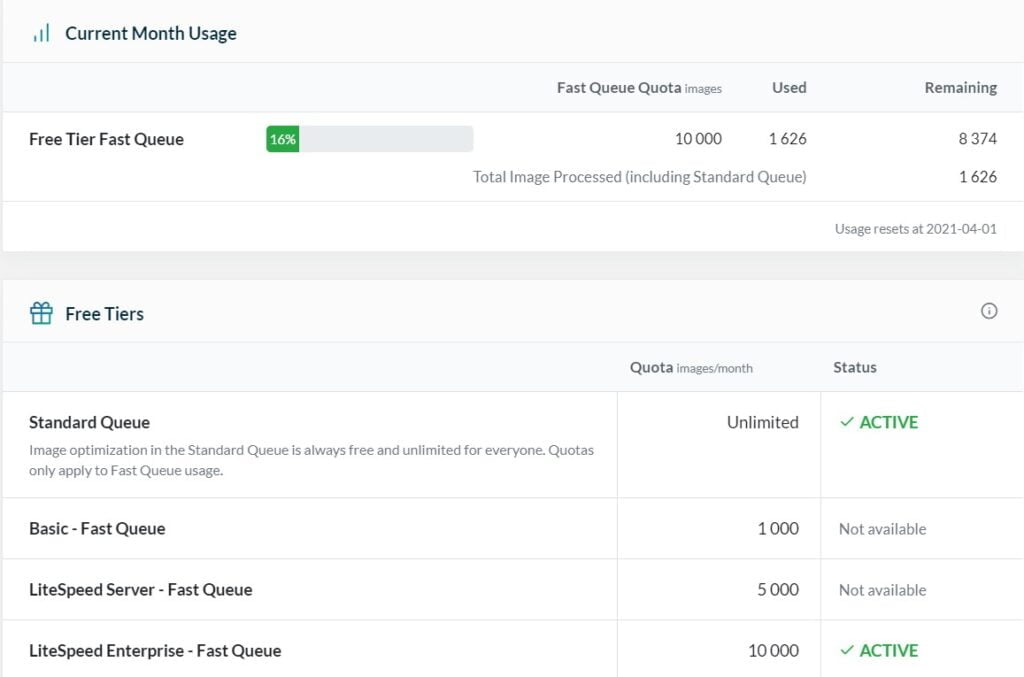
If you use Hawkhost’s Shared Hosting – Primary Plan that supports LiteSpeed Enterprise, you will receive the Fast Queue package (fast speed) with a limit of: 10,000 photos/month.
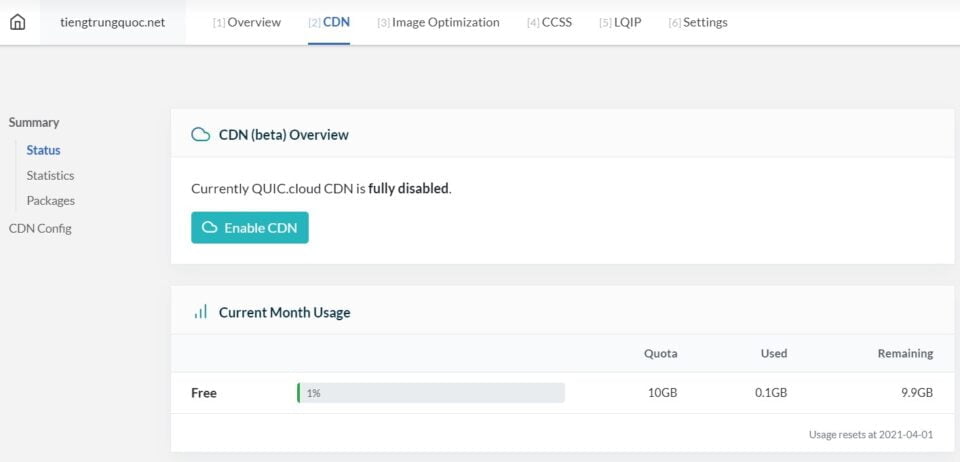
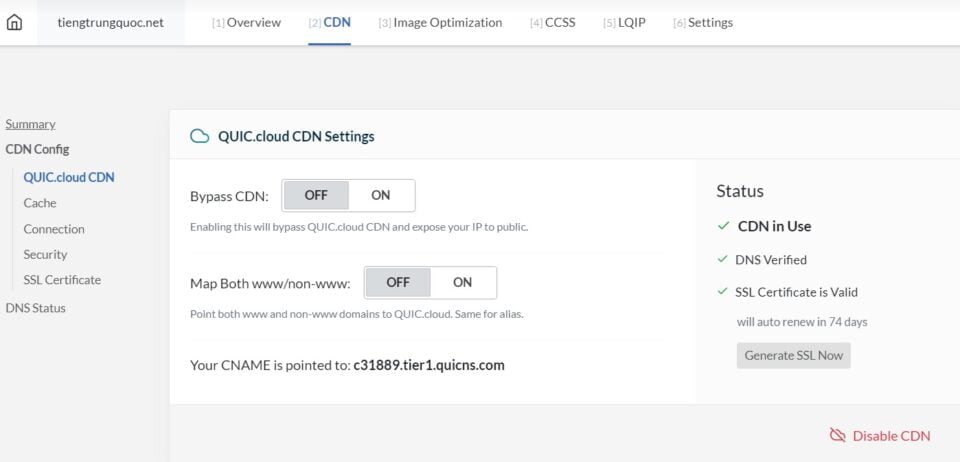
Back to the CDN!
You open the CDN tab, turn ON QUIC.cloud CDN
Return to the Overview page.
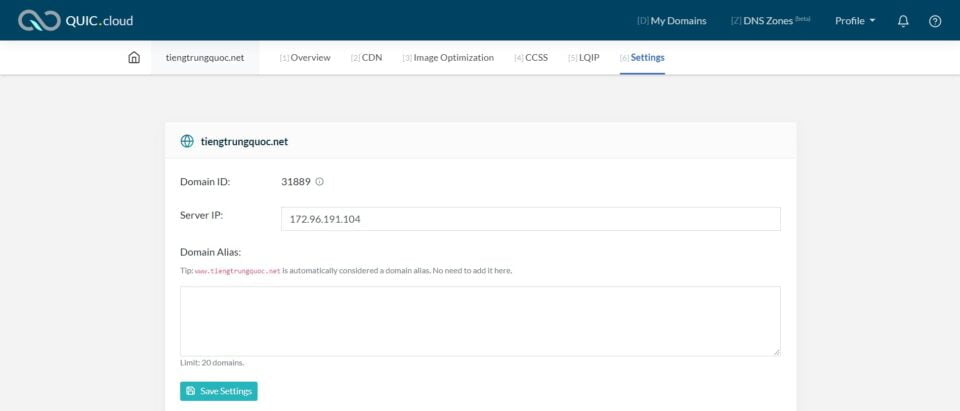
Click Visit my Dashboard on QUIC.cloud
Click on the blue domain section. Then select the Settings tab, enter your Hosting IP. Then Save Settings
Then select the CDN tab, click Enable CDN
Select Confirm Choice

Select Continue
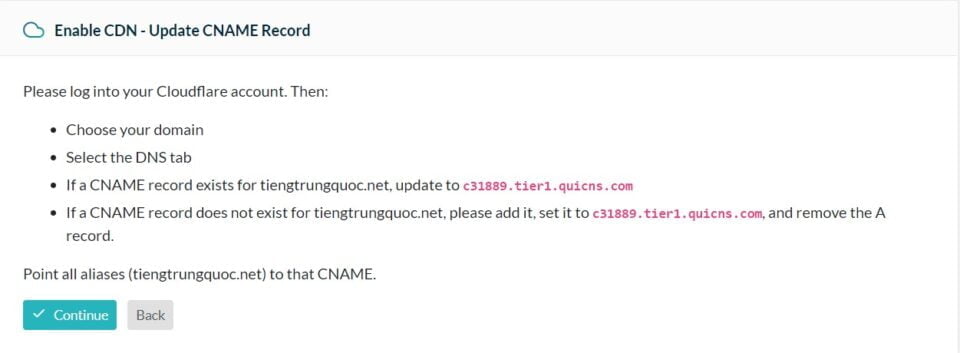
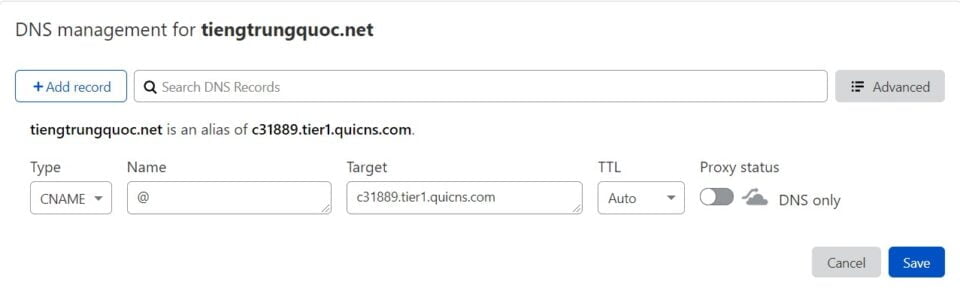
Log in to Cloud Flare do the following 2 steps:
+ Delete A record first
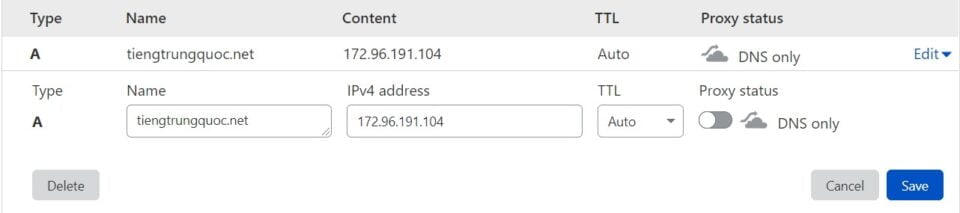
+ Add CNAME . record
Wait for about 1 minute, look to the right on QUIC’s admin panel, click Refresh Status to see the status state, if you see a check mark similar to this, it’s OK:
Then click Flush All CDN Cache
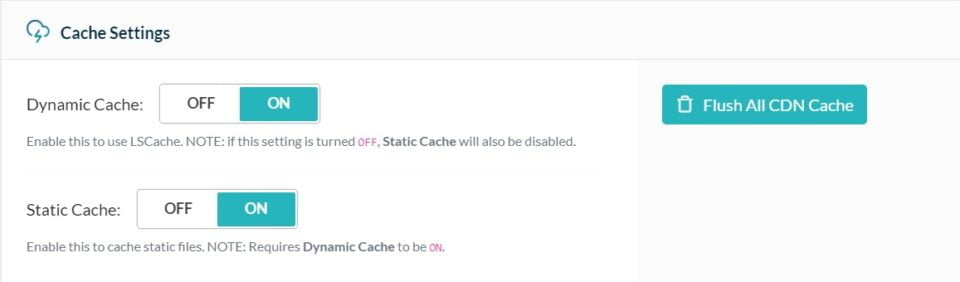
Dynamic Cache: to cache html pages on CDN. Should stay ON so that the WordPress website has the highest possible speed.
Static Cache: to cache static resources on the CDN. OFF or ON is up to you. If you leave it ON and the website has a lot of traffic, you may quickly run out of free space. Leaving it ON will help to reduce your original host load.
Note: QUIC.Cloud’s CDN has a certain monthly limit, if you use it up this month, turn off the CDN, use it next month.
In my opinion, you just need to turn on the Static Cache, use the CDN. When it notices via email that 80% of the quota is used, it turns off.
Host package Shared Hosting – Hawkhost’s Primary Plan supports LiteSpeed Enterprise, the limit is 10Gb/month
6. Result
4.1. Method 1:
To test the speed of the website on servers others but Server Vancouver, Canada (default), you need to register free account and login on gtmetrix.
The first scan may not be cached, you should scan for the 2nd, 3rd time! Each time should be apart about a few minutes to avoid overloading the server.
4.2 Method 2
METHOD 2 IS MORE STABLE AND RESULTS BETTER THAN METHOD 1.
The first scan may not be cached, you should scan for the 2nd, 3rd time! Each time should be apart about a few minutes to avoid overloading the server.
Note: QUIC.Cloud’s CDN has a certain monthly limit, if this month you use it up, turn off the CDN, then you use method 3. Next month, turn on the CDN again.
My site is using 20 plugins and hosting package Shared Hosting – Plan Primary of Hawkhost Location Singapore
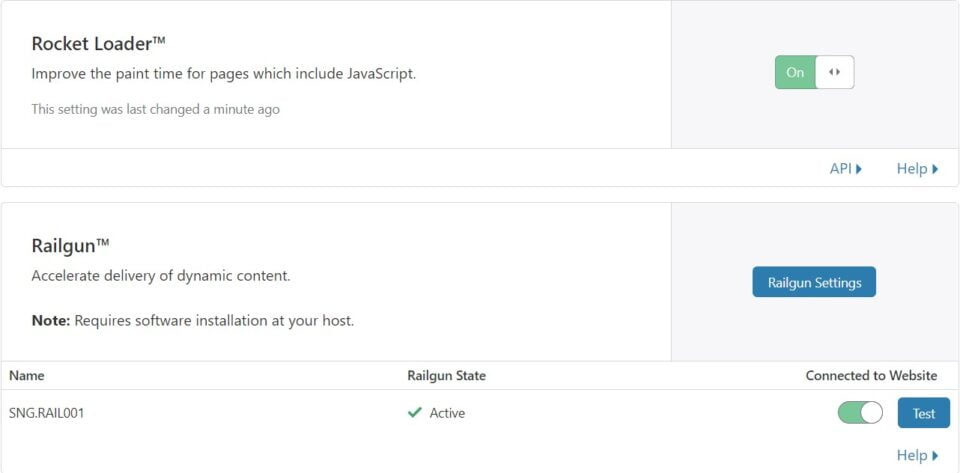
This hosting plan supports Litespeed Webserver (LiteSpeed Enterprise), Memcached, Opcode Cache and CloudFlare Railgun Technology
In the case you do not like foreign servers or foreign providers but prefer Vietnamese servers, Vietnamese suppliers for convenience in exchanging and supporting your requests, you can also buy AZDIGI’s Turbo Hosting 4.


